Breitling E-Commerce Tracking Setup
I will be documenting the complete e-commerce tracking setup for the Swiss luxury watch brand, Breitling.
E-COMMERCETRACKINGDATA AND ANALYTICS
David Kamaras
11/17/202512 min read
Advertising platforms provide a wealth of data up to the click, but they go dark on the most important part: what happens after a user interacts with the ad. They provide the necessary tools, but the setup and implementation are entirely your responsibility. While this process often appears complicated to e-commerce businesses, I assure you it is straightforward and manageable!
In this resource, I'm diving into the e-commerce tracking setup for Breitling, an internationally renowned Swiss luxury watch manufacturer. My guide will cover the configuration of Google Tag Manager, datalayer scripts and Google Analytics tracking. I will be documenting the entire end-to-end process.
Let's dive right in!
Project Scope and Methodology
It's common for webshops to be built on popular platforms, or for a website to utilize multiple backend systems. A typical example of the latter is the hotel industry, where one system might handle the main website (such as a custom build or WordPress) and a completely separate engine manages the booking and payment process.
For this demonstration, I will treat the project as the Breitling website were built on a fully custom solution (not on a popular platform like Shopify, WooCommerce, or Magento.) where a single system manages the entire digital experience.
The Role of Google Tag Manager (GTM)
For this entire setup, I will be using Google Tag Manager (GTM) to manage all analytics and conversion tracking. By utilizing GTM, I need to install the Google Tag Manager snippet directly onto the website. All other tracking codes will then be deployed through GTM.
This is critical because I will not be relying on direct platform integrations. While some popular e-commerce platforms offer simple direct integrations - where you just enter the Google Analytics Measurement ID, Meta Pixel ID, and Google Ads Conversion ID, and the tracking is done - fully custom-built solutions typically lack this feature. Thus, I will add every tracking code via GTM.
Datalayer Implementation
Given my premise that the website is a custom solution, I generally cannot rely on GTM's built-in or custom auto-event listeners for the tracking setup. Instead, the most reliable approach is to request that the developer team to push user interaction data directly to the Data Layer when key events occur (e.g., add to cart, checkout steps, purchase).
Although implementing tracking on a fully custom solution may seem the most complicated at first glance, it is actually the most flexible method. Also this choice allows me to demonstrate the entire tracking process, from planning and data requirements to execution and validation.
Moreover, asking a developer to push custom data to the Data Layer is the best way to build a highly robust and accurate tracking system.
Note that, even though this is an advanced resource, topics like server-side tracking or Consent Mode are beyond the scope of this tutorial.
Overview of Breitling.com
Before I dive deep into the configuration and setup, I will show you the current structure of the Breitling website as it is is November 2025.

Download the Resources
Enter your email address to download all the resources come with this e-commerce setup.
Project Phases
To make this process manageable, I have divided the implementation into the following six phases:
1. Creating the Measurement Plan
2. Creating the Google Tag Manager container
3. Generating the required Data Layer scripts for the development team
4. Building the tracking in Google Tag Manager (setting up variables, triggers, and tags)
5. Google Analytics configuration
6. Validation, troubleshooting
The next step is to initiate the planning phase by gathering all the necessary product and journey information to define our Data Layer requirements. Let's dive in.
1. Creating the Measurement Plan
To craft a proper measurement plan, I like to start by answering these six essential questions:
What product properties do I need to track?
What is the business goal?
What are the primary website goals?
What do the user journeys leading to these goals look like?
What is the website's underlying platform (or 'engine')?
Are there any technical details about the website that might be important?
Let's break these down one by one.
1. What product properties do I need to track?
Beyond the 'universal' properties (like item_id, item_name, item_brand, item_category, price), the real power lies in tracking industry-specific details that drive buying decisions.
Examples include the motor type for a vehicle manufacturer, a project's location for a property developer, or the diameter for a watch manufacturer.
Based on how the Breitling website works, these are the key properties to track:
Case Material, eg. Titanium, Stainless steel, Ceramic, etc.
Diameter, eg. 42mm, 44mm, 46mm, etc.
Caliber, eg. Breitling 01 (Manufacture), Breitling 77, Breitling 82, etc.
Movement, eg. Thermocompensated SuperQuartz, Self-winding mechanical, etc.
Jewel, eg. no jewels, 3 jewels, 47 jewels, etc.
Strap Material, eg. Alligator leather, Stainless steel, Rubber, etc.
Strap Color, eg. Aquamarine, Blue, Gold brown, etc.
Dial Color, eg. Carbon, Green, Yellow, Turquoise, etc.
Preorder, Yes or No
Availability, In stock or Out of stock
2. What is the business goal?
The answer to this question may seem obvious: to sell luxury watches, both online and offline. However, answering this seemingly trivial question is still critical because it provides the necessary context for the next step: defining the primary website goals that are directly aligned with the overall business objectives.
Websites typically have multiple goals, which might include driving purchases, generating leads, collecting contact form submissions, acquiring newsletter subscribers, or getting users to use a tool like a calculator. It is important to realize that not all website goals are directly linked to the core business goal.
Eg. for Breitling, the primary website goal of driving online purchases is directly linked to the business goal of selling watches. However, a goal like collecting newsletter subscribers is only indirectly connected to the final business objective, as it supports future sales through nurturing and remarketing.
Understanding this distinction is essential for proper tracking prioritization.
3. What are the primary website goals?
In this step, I identify the website goals that directly align with the company's business objectives, as these will form the foundation for my e-commerce measurement plan.
For Breitling, I can define the following key goals:
A) Online Sales (Purchases)
B) Appointment Booking
The Appointment Booking feature is accessible from any product page. This type of lead generation directly supports the company's goals, similar to online sales. This is because we are dealing with products - luxury watches - where minute details are extremely important. Customers therefore often want to handle, inspect, and try on the items in person before making a purchase.
Furthermore, given the high value of these products, ranging from €4,000 to €40,000 or more, customers are often hesitant to pay the full price online upfront when the option for an in-person viewing and consultation is available.
4. What do the user journeys leading to these goals look like?
Users need to go through the following steps in order to purchase a product (some steps might be skipped):
- View a list of items (e.g., Category Page).
- View a product page.
- Add items to their shopping cart.
- View their shopping cart.
- Remove items from their shopping cart.
- Begin checkout.
- Submit their shipping information.
- Submit their payment information.
- Complete a purchase.
Moreover, to book an appointment at one of the stores, the following steps are necessary:
- Click on the Book an Appointment button on a product page.
- Select a store in the appointment booking journey.
- Book an appointment.
5. What is the website's underlying platform (or 'engine')?
I already addressed this, so this is just a quick recap: for this demo, I will treat the project as the Breitling website were built on a fully custom solution, not on a popular platform like Shopify, WooCommerce, or Magento.
6. Are there any technical details that might be important regarding the website?
Nothing special.
- A single system manages the entire digital experience.
- There is an easy way to place test orders.
- New releases of major development's aren't expected within the next quarter.
2. Creating the Google Tag Manager container
I mentioned in the introduction that for this entire setup, I will be using GTM to manage all tracking codes. Therefore, creating a GTM container is the next step before going even deeper into the process.
Navigate to the official Google Tag Manager website and sign in with your Google Account. If you already have a GTM Account, you can select it and click the three-dot menu next to it, or click the "Create Container" button, which is usually visible when viewing your accounts.
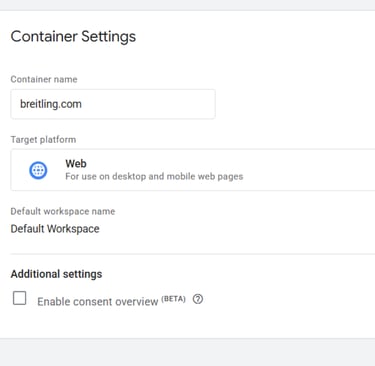
Enter a Container Name (here I enter breitling.com). Select the Target Platform. For a website, choose Web (this is the most common option). Other options include iOS, Android, AMP, and Server.

After creation, GTM will immediately display two code snippets. These are the pieces of code you must install on your website.
The first snippet goes in the <head> section of every page.
The second snippet goes immediately after the opening <body> tag of every page.
3. Generating the required Data Layer scripts for the development team
This is where the most interesting part of the setup begins. This section is dedicated to creating all the necessary Data Layer scripts for the development team to implement in the website code. These scripts are derived from the information gathered during the first phase, specifically the user journey steps and the product properties to track.
1. Login and logout events
Trigger the following script when a user logs in:
Trigger the following script every time a new page loads while the user is logged in. Place this code above the Google Tag Manager container. This is necessary for me to be able to track individual users.
The following datalayer push must not contain the event key!
Trigger the following script when a user logs out:
2. Purchase journey
Trigger the following script when a user views a list of items, include all items displayed:
Trigger the following script when a user views a product page:
Trigger the following script when a user adds items to their shopping cart:
Trigger the following script when a user views their shopping cart:
Trigger the following script when a user removes items from their shopping cart:
Trigger the following script when a user begins checkout:
Trigger the following script when a user submits their shipping information:
Trigger the following script when a user submits their payment information:
Trigger the following script when a user completes a purchase.
It can only run once per successful order, so in case of a possible Thank You page, if the user refreshes the Thank You page, this code should not run again, because it would give misleading information (duplicate conversions).
You need to insert a dataLayer variable called new_customer. The new_customer variable has three values: true, false or not specified. Based on whether or not the customer's email address has been found in the database of customers, it has to return one of these values:
'true': for new customers
'false': for existing customers
'not specified': if there's uncertainty
3. Appointment booking journey
Trigger the following script when a user clicks on the Book an Appointment button on a product page:
Trigger the following script when a user selects a store in the appointment booking journey:
Trigger the following script when a user books an appointment:
4. Building the tracking in Google Tag Manager
Once this structure is in place, the configuration in Google Tag Manager becomes quite straightforward.
This is my favourite part of the setup since I can start working on the Google Tag Manager tracking setup while the development team works on implementing the data layers.
First, I'll need to create several variables based on the data layer implementation details provided for the development team. Specifically, I need to create one variable for each parameter I want to track. For example, to extract the purpose of the appointment, I configured the following Data Layer Variable.
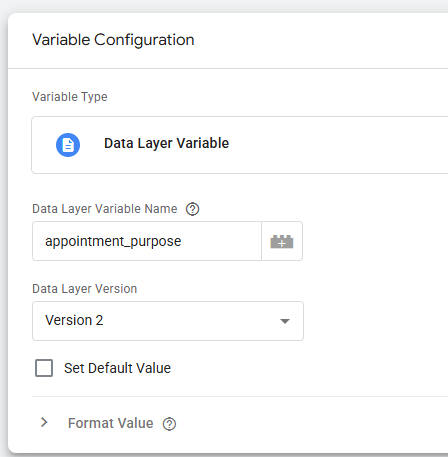
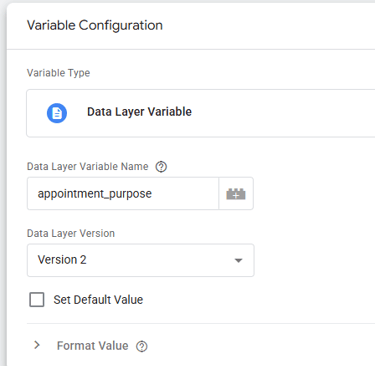
Below you can find the list of variables I'm creating.
1. Variables for user tracking:
User ID: user_id (Data Layer Variable configuration in Google Tag Manager)
2. Variables for the Purchase journey:
Value: ecommerce.value
Tax: ecommerce.tax
Currency: ecommerce.currency
Transaction ID: ecommerce.transaction_id
Products: ecommerce.items
3. Variables for the Appointment booking journey:
Lead source: lead_source
Store: appointment_store
City: appointment_city
Date: appointment_date
Time: appointment_time
Purpose: appointment_purpose
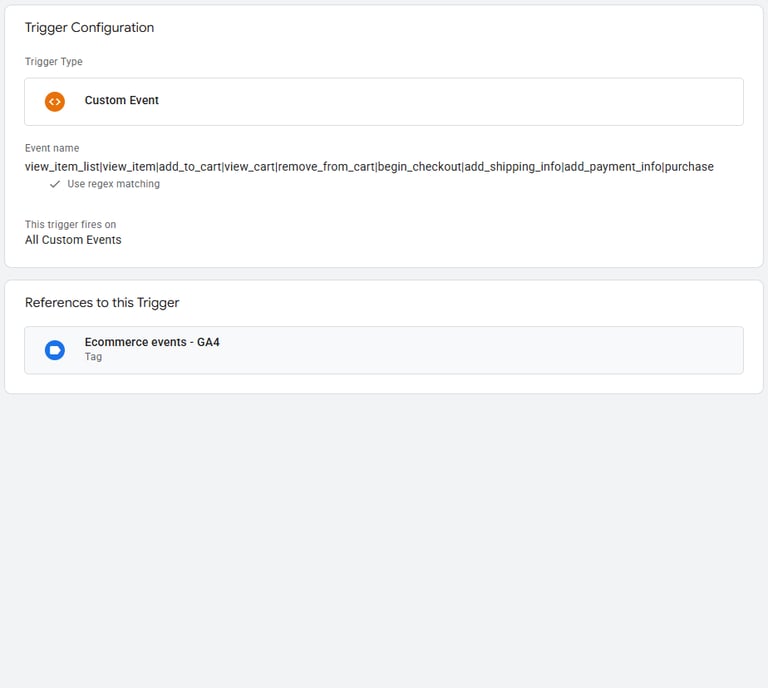
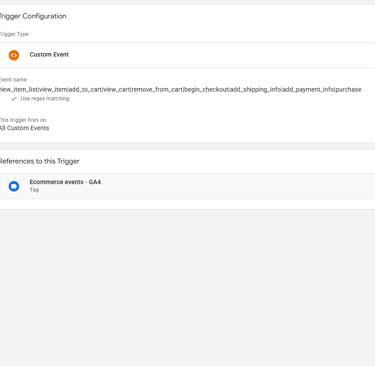
Once all the variables are set up, I can proceed to create the triggers. For this implementation, I will only create three main triggers: one for e-commerce events, one for lead generation events, and a third for authentication events. These triggers are defined based on the Data Layer documentation I created, as they are configured to fire on specific custom event combinations.
Here's what the setup for the e-commerce events trigger looks like:
Below you can find the list of triggers I'm creating.
E-commerce events trigger
Settings: all custom events, use regex matching.
view_item_list|view_item|add_to_cart|view_cart|remove_from_cart|begin_checkout|add_shipping_info|add_payment_info|purchase
Lead gen events trigger
Settings: all custom events, use regex matching.
appointment_booking_click|select_store|generate_lead
Authentication events trigger
Settings: all custom events, use regex matching.
login|logout
Once all triggers are set up, the final step is configuring the tags to establish the live connection between the website interactions and Google Analytics.
First, I'll create the core GA4 Configuration Tag (sometimes referred to simply as the Google Tag). This tag must fire on all page views, essentially serving as our base-level, general page view tracking.
Beyond this core configuration, I only require three additional Google Analytics event tags, each directly corresponding to the custom triggers we just built: one tag for e-commerce events, one for lead generation events, and one for authentication events.
E-commerce event tag setup:
For the e-commerce tag specifically, I don't need to add variables of product properties individually. Instead, I only need to enable "Send E-commerce data" under More Settings > E-commerce.
Leadgen tag setup:
In contrast, for the lead generation tag, I must manually include the relevant variables. These include: Lead Source, Store, City, Date, Time, and Purpose.
This configuration is necessary because while e-commerce setups are relatively standardized across industries, lead generation often involves unique data requirements for every industry or client, necessitating a more customized configuration.
Authentication events tag setup:
5. Google Analytics configuration
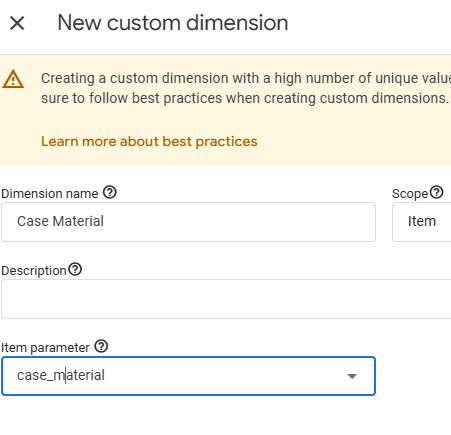
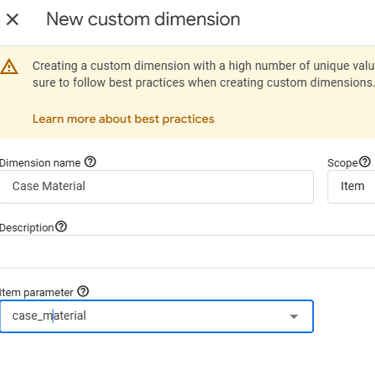
In this setup, I am tracking numerous custom item-scoped parameters. While Google Analytics automatically recognizes standard e-commerce parameters, custom item-level parameters are only available in report if these are manually configured as Custom Dimensions within GA4.
To do this, navigate to Admin > Data Display > Custom Definitions. In this section, I need to add each custom item-scoped parameter individually and ensure the Scope is set to Item.
It is critical to note the limitations here: while Google allows you to include up to 27 custom parameters within the items array in the Data Layer, standard GA4 properties only permit configuring a maximum of 10 item-scoped custom dimensions for reporting.
Data validation, troubleshooting
Once the Google Tag Manager setup and Google Analytics configuration are complete, and the developers have fully implemented all the data layer scripts, data will begin flowing instantly to Google Analytics. A critical next step is to validate both the development team’s implementation and my own configuration, as it is common to find issues that require immediate correction.
To execute this validation, I will use the Google Tag Manager Preview Mode in conjunction with the Google Analytics DebugView. This involves systematically interacting with the website to ensure all configured events and parameters fire correctly, confirm Data Layer variables are being read properly by GTM, and verify that the resulting data appears accurately in GA4’s debug console.
The validation process must be executed end-to-end to confirm the integrity of the data stream. We verify the flow using a two-step approach while systematically interacting with the website:
1. Data Sent Check (GTM Preview Mode): I will use the Google Tag Manager Preview Mode to ensure the Data Layer is firing the correct custom events and that all configured variables are successfully reading and capturing the necessary data parameters. This step confirms the data is properly sent from the website to GTM.
2. Data Received Check (GA4 DebugView): Simultaneously, I will check the Google Analytics DebugView. This confirms that the GTM tags are firing correctly and that the resulting data is properly received by GA4, showing up accurately with the right event names and associated parameters.
This rigorous, systematic interaction ensures all configured events and parameters fire correctly and that the data is clean upon arrival in GA4’s reporting interface.

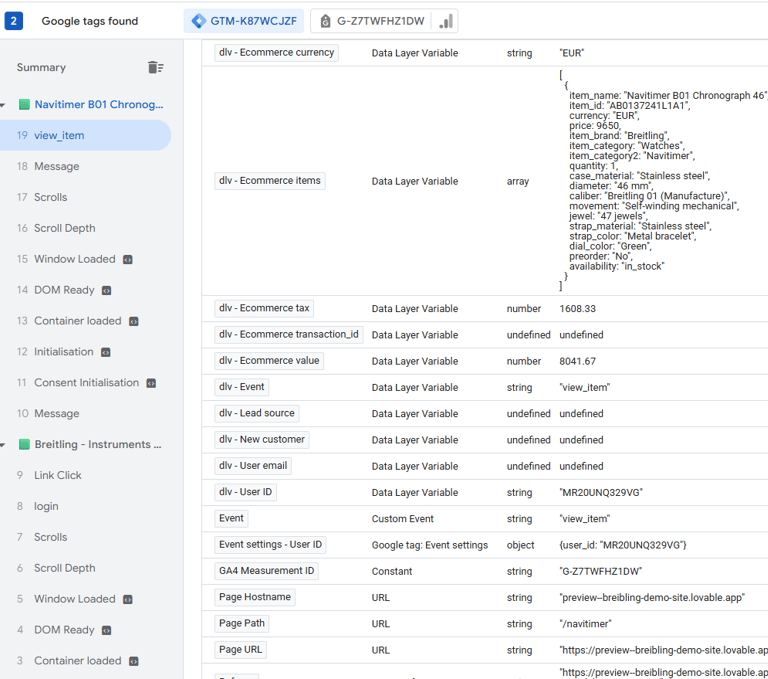
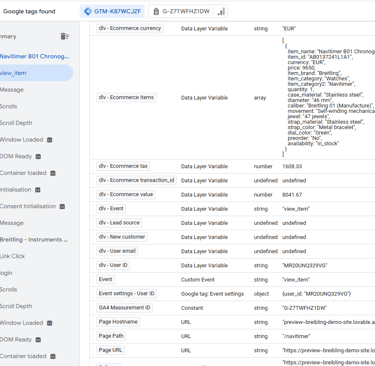
Validating that variable values can be extracted correctly for the view_item event:
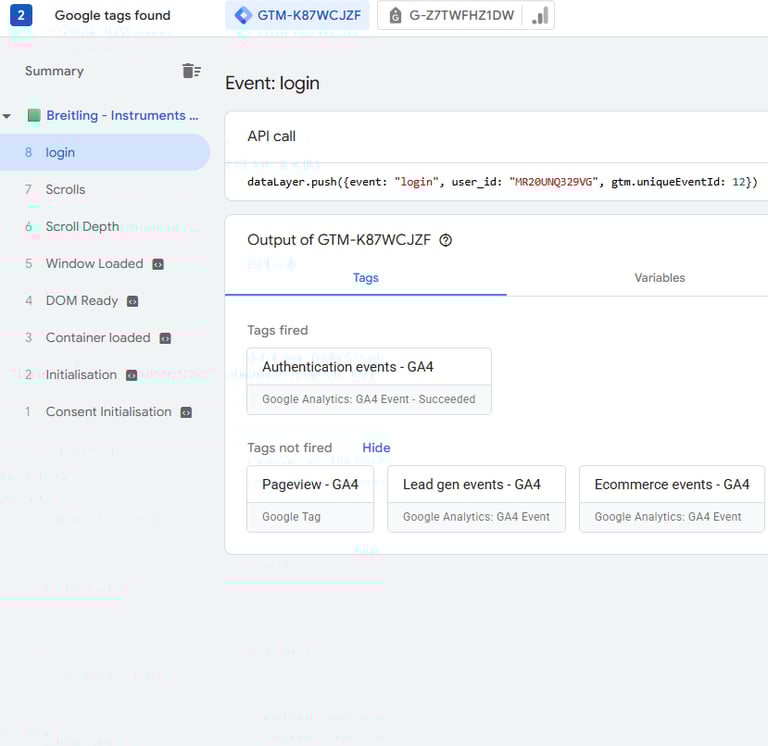
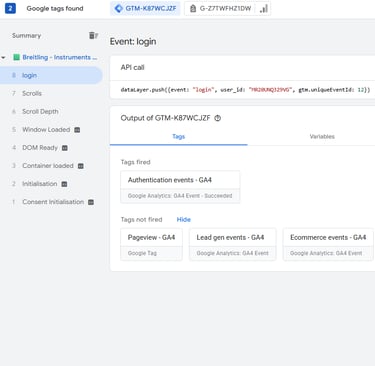
Validating that Google Tag Manager sends the view_item event to GA4:


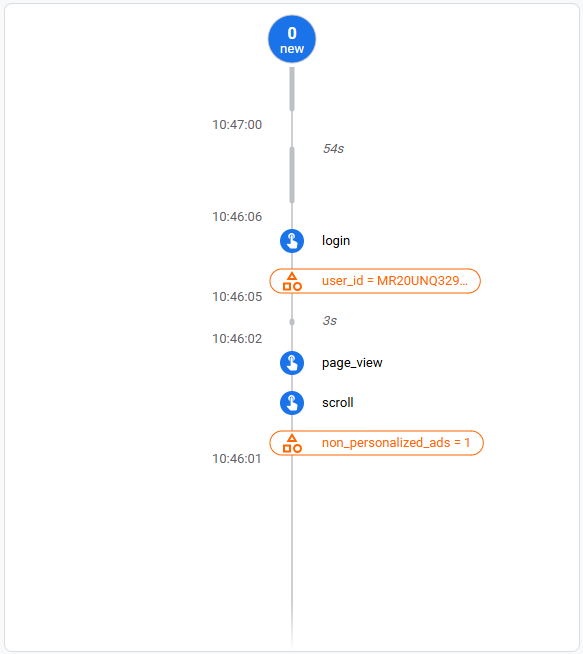
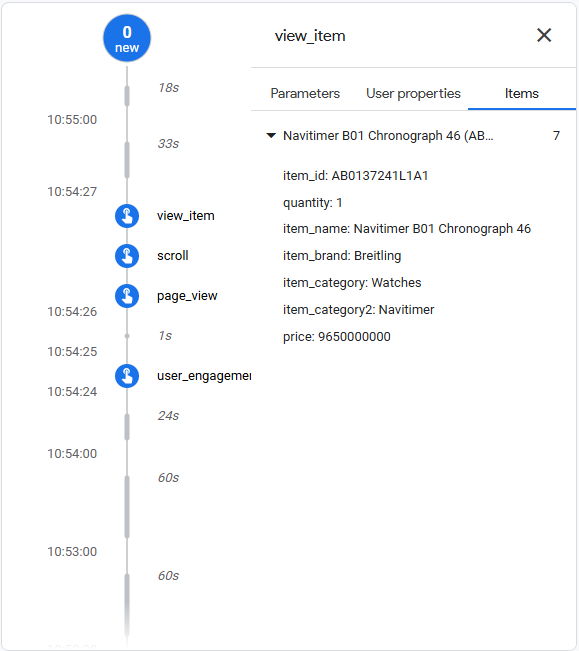
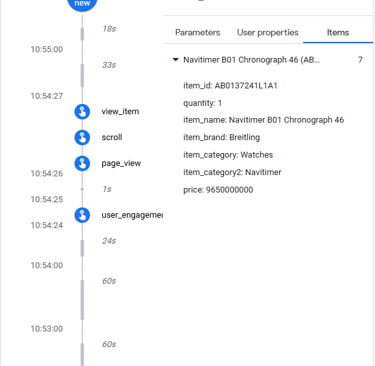
Validating that Google Analytics receives the view_item event:
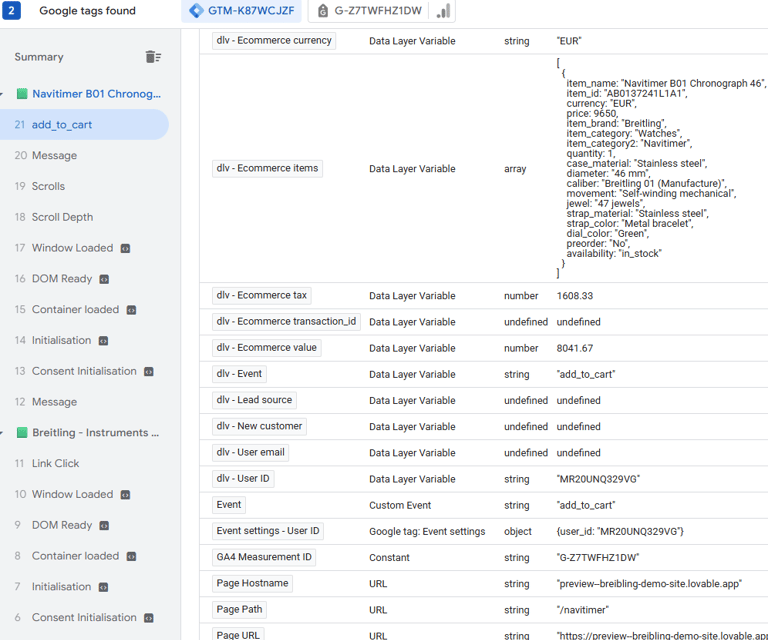
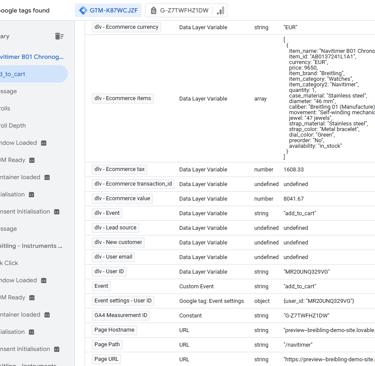
Validating that variable values can be extracted correctly for the add_to_cart event:
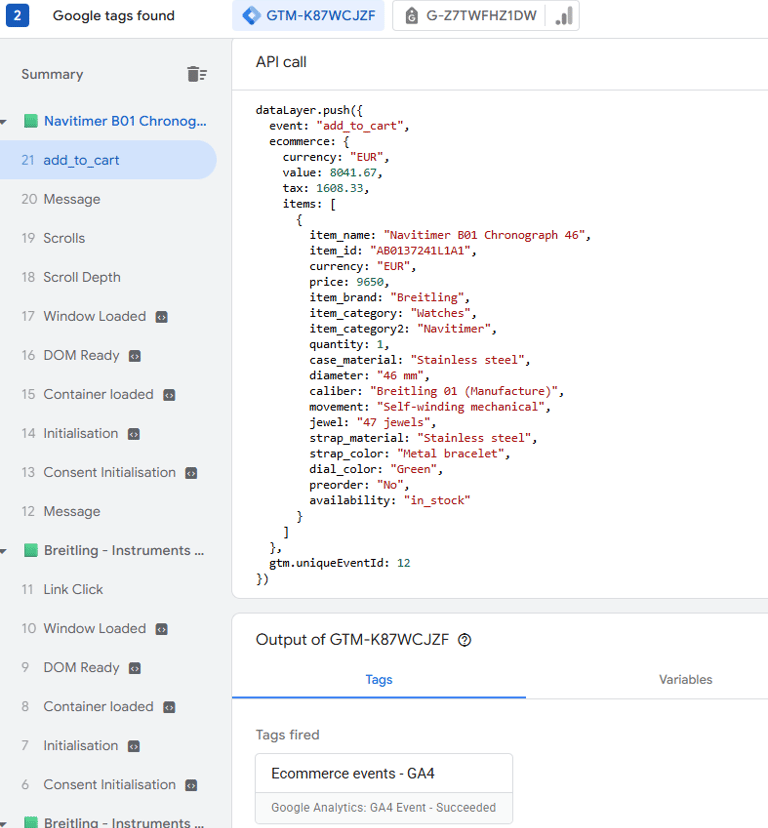
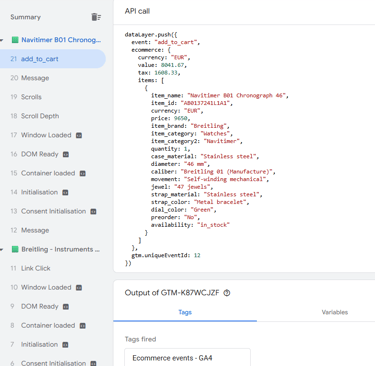
Validating that Google Tag Manager sends the add_to_cart event to GA4:
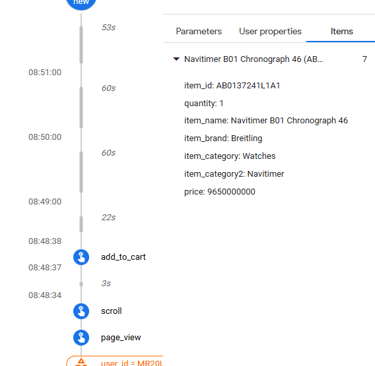
Validating that Google Analytics receives the add_to_cart event:

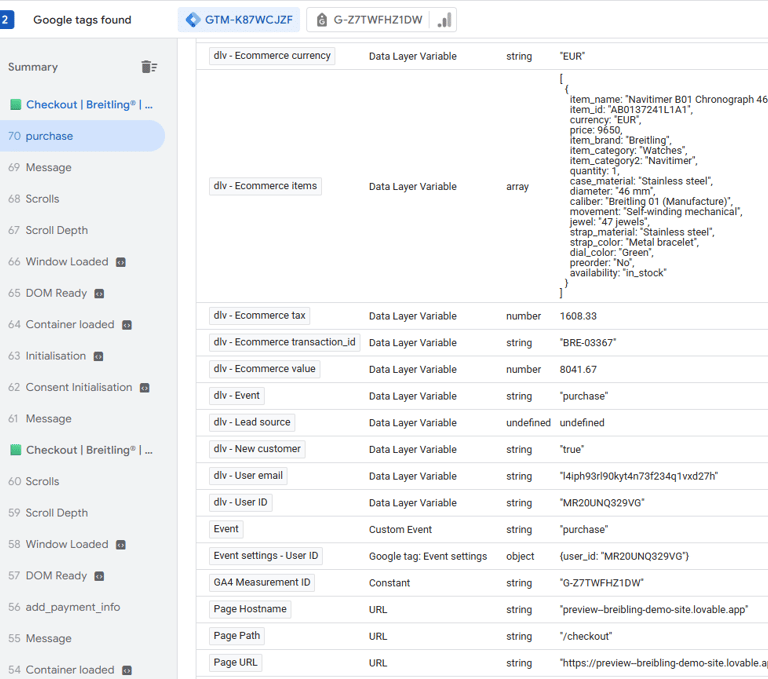
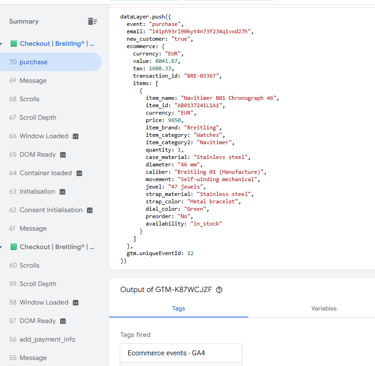
Validating that variable values can be extracted correctly for the purchase event:
Validating that Google Tag Manager sends the purchase event to GA4:

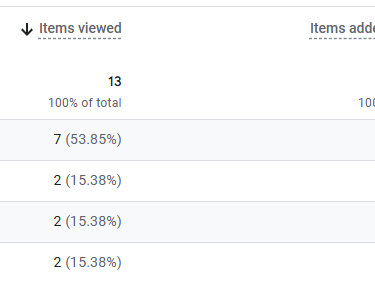
Output on Google Analytics
Once everything is done correctly, insightful e-commerce reports like the one below will be available within Google Analytics.